Wednesday, 15 March 2017

Exception in thread "main" org.hibernate.service.spi.ServiceException: Unable to create requested service [org.hibernate.cache.spi.RegionFactory]

This exception occurred when I was trying Session Factory Level Cache. I tried to find out the reason for it by visiting many sites. But I didn't get the reason for it. Later I got the solution for this problem. 


The Java Project structure is shown in the below figure.Student class has the following properties shown in the same figure.

Hibernate 5.2.8 is used in this example project. All the required jars of hibernate framework are added to the build path. Oracle 11g Express Edition is used as DB. 

The ehcache.xml contains the following code:
           <ehcache xmlns:xsi="http://www.w3.org/2001/XMLSchema-instance"
          updateCheck="false">
        <defaultCache maxElementsInMemory="1000" eternal="false"
timeToLiveSeconds="60" overflowToDisk="false" />
            </ehcache>

student.hbm.xml contains the following code:
            <!DOCTYPE hibernate-mapping PUBLIC 
             "-//Hibernate/Hibernate Mapping DTD 3.0//EN"
             "http://www.hibernate.org/dtd/hibernate-mapping-3.0.dtd">
            <hibernate-mapping>
     <class name="beans.Student" table="student" schema="system">
<cache usage="read-write" />
<id name="id"></id>
<property name="name"></property>
<property name="email"></property>
<property name="marks"></property>
     </class>
             </hibernate-mapping>

oracle.cfg.xml contains the following code:
          <!DOCTYPE hibernate-configuration PUBLIC
      "-//Hibernate/Hibernate Configuration DTD 3.0//EN"
        "http://www.hibernate.org/dtd/hibernate-configuration-3.0.dtd">
           <hibernate-configuration>
      <session-factory>
<property name="connection.driver_class">oracle.jdbc.OracleDriver</property>
<property name="connection.url">jdbc:oracle:thin:@localhost:1521:xe</property>
<property name="connection.username">system</property>
<property name="connection.password">kiru</property>
<property name="connection.pool_size">10</property>
<property name="dialect">org.hibernate.dialect.OracleDialect</property>
<property name="hbm2ddl.auto">update</property>
<property name="show_sql">true</property>
<!-- use second level cache -->
<property name="cache.use_second_level_cache">true</property>
<property name="cache.region.factory_class">org.hibernate. cache.ehcache.                                           EhCacheRegionFactory</property>
<property name="net.sf.ehcache.configurationResourceName">resources                                                /ehcache.xml</property>
<property name="hibernate.current_session_context_class">thread</property>
<mapping resource="resources/student.hbm.xml" />
      </session-factory>
              </hibernate-configuration>

SessionLevelFactoryCache.java contains the following code:
       package test;

       import org.hibernate.Session;
       import org.hibernate.SessionFactory;
       import org.hibernate.cfg.Configuration;
       import beans.Student;

       public class SessionFactoryLevelCache {
  public static void main(String[] args) {
Configuration cfg = new Configuration();
cfg.configure("resources/oracle.cfg.xml");
SessionFactory sf = cfg.buildSessionFactory();
Session s = sf.openSession();
Student st1 = (Student) s.get(Student.class, 13);
System.out.println(st1.getName());
Student st2 = (Student) s.get(Student.class, 13);
System.out.println(st2.getName());
Session s2 = sf.openSession();
Student st3 = (Student) s2.get(Student.class, 13);
System.out.println(st3.getName());
s.close();
s2.close();
sf.close();
      }
          }

The above error was coming when i tried to execute the above class. Then i tried to add the optional jars (ehcache jars) present in the optional folder in Hibernate 5.2.8-final.jar


The following jars are present in the ehcache folder.

For working with cache, we need to add these 3 jars to the build path of the project. After adding the 3 jars, the program executed without any errors as shown in the below fig.


Thursday, 29 December 2016

Adding logger properties to Websphere Application Server to generate log files

It is a good practice to add loggers to our code, as it will make the code debugging easier. The below steps illustrates how to add logger properties to Websphere Application Server so that the loggers that are added in the code will be executed when the application is running on Websphere Application Server.

Ø Login to WAS

Ø  Click on Servers -> Server Types -> WebSphere application servers

Ø  Click the server in which the application or software is installed. (Here it is Samples Server)

Ø  Expand Java and Process Management which is present in Server Infrastructure. Click Process definition.

Ø  Click on Java Virtual Machine present in Additional Properties Section.

Ø  Click the Custom Properties link present in Additional Properties.

Ø  Click the New Button (Note: Properties can be added only through the user profiles with admin privileges.)

Ø  Add the required property. For ex., let us add a property with name rlogger.appender.rollingfileappender in the name field. Add true as value in value field. Then click on apply.

Ø  Now this property will be added to the local configuration.
Ø  Click on Save directly to the master configuration, so that changes are done at Main profile level i.e., at manager level.
Ø  Add the remaining properties in the same manner.

Ø  Restart the server.
Ø  To make sure that the properties are added correctly, we can check it by viewing server.xml file which is present at the installed directory off websphere.
Ø  The default location is <INSTALLED DIR>IBM\WebSphere\AppServer\profiles\ODMSample8800\config\cells\SamplesCell\nodes\SamplesNode\servers\SamplesServer
Ø  Here ODMSample8800 is the ODM 8.8 software which is installed in the AppServer profile.
Ø  We can view the properties under the <jvmEntries></jvmEntries>


Wednesday, 5 October 2016

Java Program to create a table in a Database

The following Java Program is an example of creating a table in a database.

package sample;

import java.sql.Connection;
import java.sql.DriverManager;
import java.sql.SQLException;
import java.sql.Statement;

class CreateTable
{
public static void main(String[] args) throws SQLException,ClassNotFoundException
{
Class.forName("oracle.jdbc.driver.OracleDriver");
Connection con= DriverManager.getConnection ("jdbc:oracle:thin:@localhost:1521:xe", "system","kiru");
Statement st=con.createStatement();
if(!st.execute("create table student(sno number(2),sname varchar(10))"))
  System.out.println("table is created");
}
}

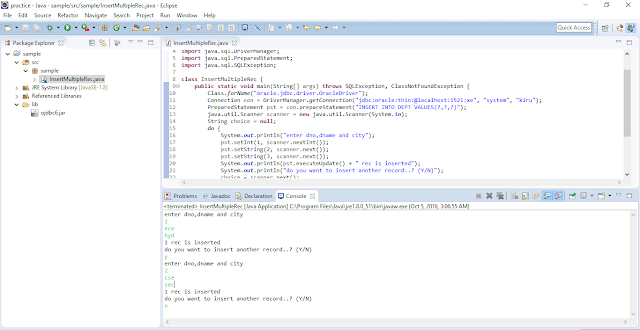
Oracle Express DB is used in this example. The folder structure and the output of the following program are shown in the fig below.

Java Program to insert Mutiple Records in a Database

The following java program is an example of inserting multiple records in a database.

package sample;

import java.sql.Connection;
import java.sql.DriverManager;
import java.sql.PreparedStatement;
import java.sql.SQLException;

class InsertMultipleRec {
public static void main(String[] args) throws SQLException, ClassNotFoundException {
Class.forName("oracle.jdbc.driver.OracleDriver");
Connection con = DriverManager.getConnection("jdbc:oracle:thin:@localhost:1521:xe", "system", "kiru");
PreparedStatement pst = con.prepareStatement("INSERT INTO DEPT VALUES(?,?,?)");
java.util.Scanner scanner = new java.util.Scanner(System.in);
String choice = null;
do {
System.out.println("enter dno,dname and city");
pst.setInt(1, scanner.nextInt());
pst.setString(2, scanner.next());
pst.setString(3, scanner.next());
System.out.println(pst.executeUpdate() + " rec is inserted");
System.out.println("do you want to insert another record..? (Y/N)");
choice = scanner.next();
} while (choice.equalsIgnoreCase("Y"));

scanner.close();
pst.close();
con.close();
}
}

Oracle Express database is used in this example. If the choice is either "y" or "Y" ,it asks for inserting another record or else the program gets terminated. The sample output of this program is shown in the below fig.

Thursday, 29 September 2016

Dynamic Domains At Rule Designer Using Database

Go to window and select Samples Console from open perspective. Then click on import projects in Data sources for BOM Domains to import the project as shown in the below fig.

Now the bomdomainpopulate project is imported into our Rule Designer. This project uses a plugin project with the name ilog.rules.studio.samples.bomdomainpopulate to fetch the domain values from DB. This plugin project works with Derby DB. To work with Derby DB, we can refer the following link here

If we want to use a database other than derby, then we need to do some changes in the plugin project, so that it can work with the preferred DB. To do the changes in the plugin project, we need to follow these steps

Go to File and select import. Select Plugins and Fragments from the import window as shown and click on next.

Select Project with source folders and click on next.

Select ilog.rules.studio.samples.bomdomainpopulate and click on add.

Click on Finish. 

We have imported is an existing plugin project. Now we will do the following changes in this project, to make it work with other DB. Click on the plugin project and select properties. Click on Java Build Path and remove derbyclient.jar and click on ok.

Now remove the derbyclient.jar from lib folder.

Now add the required DB driver jar file in the lib folder as shown. For eg., let us make this plugin to fetch domains from Oracle DB. So add ojdbc6.jar file in the lib folder.

Then Select the plugin project and click on properties. Click on java Build Path and add the ojdbc6.jar file, which is present in the lib folder of the plugin project.

Then click on data and select database.properties. This properties file has the properties w.r.t., derby DB.

Change the properties w.r.t. the preferred DB. For eg., the following figure shows the connection properties with reference to the Oracle DB.

After that, select the MANIFEST.MF file and click on runtime tab as shown. Remove the Derby references.

After removing the derby references, add the DB references which we wanted to use. Here we take it as oracle references.

Now click on build tab as shown in the fig and select the lib folder in which the ojdbc6.jar is present.

Now click on MANIFEST.MF tab and remove the “lib/derbyclient.jar” and add “lib/ojdbc6.jar”.

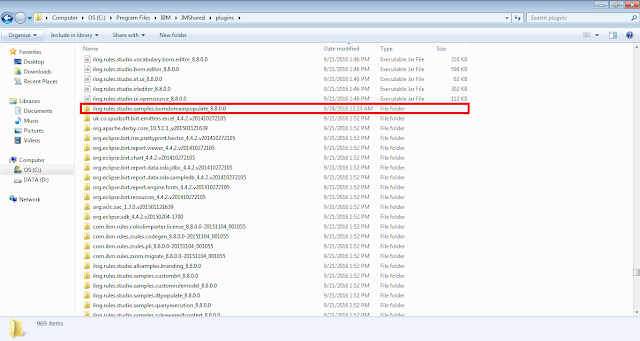
Now go the default plugin folder in your PC. The default plugin folder will be in the path: <INSTALL_DIR>/IBM/IMShared/plugins. Here the number 8.8.0.0 in the folder name refers to the ODM version we are using. Take the backup of the folder shown below. This is the same plugin project which we have worked in eclipse. But the changes done by us are done at the workspace level. To reflect the changes in the plugin level, copy the plugin project from eclipse IDE and paste in this default plugin location.

Now go the preferred DB console and enter the following commands. Click Here.

Now the changes are completed. Restart the eclipse IDE, so that the changes made in the plugin will be reflected in the eclipse IDE. After restarting the eclipse IDE, select the bomdomainpopulate-rules project and click on CurrencyType. If there are any domain values in the domains section, select “Edit the domain” option.

Select all the domains and click on remove. Click Finish.

Then select all the members and click on delete.
  
Click on save and then click on synchronize with dynamic values.

Now we will be able to see the domain values which are fetched from the preferred DB i.e., Oracle.

If we add or delete any domain values in the DB, click on synchronize with dynamic values to reflect the changes.

Sunday, 25 September 2016

Understanding The Execution Flow of Dynamic Domains at Decision Center using Database

Continued from here.
The src folder of serverbompopulate contains two classes DomainValueProvider and DomainHelper. DomainValueProvider class is the implementation of the IlrBOMDomainValueProvider class. It Relies on a DomainHelper instance to retrieve the item name, verbalization and translation of the static references defined in the Database.

This helper class combines connectivity properties for a database along with specific settings for BOM dynamic domains. A static function provides a helper for a dedicated fullyqualified class, which is responsible for providing the db values. Apart from the methods in the DomainValueProvider class which are used to set the item name, verbalization and translation ,it has a method called getValues() which has the following code:

public Collection<String> getValues(IlrClass clazz) {
this.className = clazz.getFullyQualifiedName();
DomainHelper helper = DomainHelper.getDomainHelper(className);
helper.initValues();
return helper.getItemNames();
}

Here IlrClass is the representation of classes in the object model. For eg., we have created a virtual class in bom with name Currency in trade package.
Here the currency used in the rule is of type “trade.Currency”. So when we access the currency attribute, the IlrClass will be representing the Currency class. clazz.fullyQualifiedName() returns the trade.Currency which will be assigned to className attribute.

DomainHelper class constructor is defined as private, so we cannot create the object directly. Hence getDomainHelper() is called for creating the object for DomainHelper.

public static DomainHelper getDomainHelper(String className) {
DomainHelper helper = classdomains.get(className);
if (helper == null) {
helper = new DomainHelper(className);
classdomains.put(className, helper);
}
return helper;
}

Here classdomains is the HashMap which is defined as follows
private static HashMap<String,DomainHelper>  classdomains new HashMap<String, DomainHelper>

DomainHelper helper = classdomains.get(className) code tries to find whether there is already an object in the HashMap  with the specified key i.e,trade.Currency. If the object exists, the same object will be assigned to the helper object or else, it will call the parameterized constructor of DomainHelperclass which is private.

private DomainHelper(String fullyQualifiedName) {
this.className = fullyQualifiedName;
}

This.className refers to the attribute which is defined in the DomainHelper class with String type. In this context, “trade.Currency” string will be assigned to the className attribute. The execution returns to the getDomainHelper().  classdomains.put(className, helper); code adds the className which is trade.Currency as key and the DomainHelper object with refence as helper.

This helper object will be returned to the DomainValueProvider class. Then the code helper.initValues() in the getValues() calls the initValues() in the DomainHelper class. Here the initValues() is as follows
public void initValues() {
domainItems.clear();
if (this.className.equals("trade.StatusType")) {
readValuesFromStatusTable();
} else if (this.className.equals("trade.CurrencyType")) {
readValuesFromCurrencyTable();
} else if (this.className.equals("trade.MessageType")) {
readValuesFromMessagesTable();
}
}

Here the domains items is the ArrayList which is declared as follows
private List<Item> domainItems = new ArrayList<Item>();
Here Item is a static inner class which contains three attributes i.e., name, verbalization and code. When the className string equals any of the following strings, the corresponding method will be called.

In the example we have assumed, the className string is set to “trade.Currency”, so readValuesFromCurrencyTable(); will be called.

public void readValuesFromCurrencyTable() {
Connection connection = DataBaseConnector.openConnection();
if (connection != null) {
try {
String query = "SELECT * FROM BOMDOMAINSAMPLE.CURRENCY";
Statement statement = connection.createStatement();
ResultSet set = statement.executeQuery(query);
domainItems.clear();
while (set.next()) {
String name = set.getString(1);
String verbalization = set.getString(2);
String translation = set.getString(3);
domainItems.add(new Item(name, verbalization, translation));
}
} catch (SQLException e) {
e.printStackTrace();
}
}
DataBaseConnector.closeConnection();
}

This method executes the select statement to fetch the values from the DB and it will be placed in the ResultSet object and every record will be added to the “domainItems” arraylist. Now the execution flow returns to getValues() of DomainValueProvider class and return helper.getItemNames(); returns the domain values to the Currency Class.


Creating Dynamic Domains at Decision Center using Database

Go to Samples and Tutorials window in Rule designer. Select Data sources for BOM domains in decision center tab and click on import projects.

The serverbompopulate project will be imported to the Rule designer. The src folder of serverbompopulate contains two classes DomainValueProvider and DomainHelper. When we click the DomainHelper class, we will see this following code

We can see the values are hard coded and it is not dealing with Database. So we are going to change the code so that it can work with DB. Delete the DomainHelper.java and download the two java files given in the link Click HerePlace the java files in serverbompopulate package of src folder. Add the required database driver jar into the lib folder. If Oracle DB is used, then add ojdbc6.jar into the lib folder. If derby DB is used, add derbyclient.jar into the lib folder. Here Oracle DB is taken as reference in this context. 

Then click on the serverbompopulate project and click properties. Select Java Build Path and click on add jars. Add the jar which is recently added to the lib folder of serverbompopulate.

Now we need to do some modifications in the bulid.xml file to make this project work in context with the changes. So The below fig., depicts the changes that are needed to be done in build.xml.

Give the name of your jar file in the boxes shown in the above image. As we have used Oracle DB, it is ojbc6.jar. Now the changes are done. Now go to window and then show view. Click on ant. Double-click on the repack command in the build.xml file.

This command does a series of tasks. It copies the jrules-team server.ear file into a temporary location. In that temporary location, it unpacks the ear file and then unpacks the teamserver ear file. After that, it converts the src folder of serverbompopulate to a jar file and also copies the ojdbc6.jar file to lib folder of the war file. Then it packs the war file again and then it packs the ear file. The final ear file will be seen in the websources folder of the serverbompopulate project in Rule Designer. 

After you see the BUILD SUCCESSFUL message in the console, click on deploy command in build.xml. This copies the ear file and it deploys it in the samples server.

After successful deployment, click on set-config-param command to assign the custom property with key derbyDataBaseDomainProvider. The sample logs generated when executing the repack, deploy and set-config-param can be seen here.

Now go to decision center and select bomdomainpopulate-rules project. Depending on the ODM version, it will be in Work on a rule project or in Work on a decision service.

Go to Project tab and click on Update dynamic domains

Click on the required type that is needed to be updated and click on update.

On successful updation, a message will be displayed as shown

Now we will be able to see the new domain value. If we removed a domain value from the database, then that value will be shown as deprecated and it cannot be visible in the dropdown box as shown.

For  understanding the execution flow Click Here